Gunung Belumut Day Hike – The Crown of Kluang
Back in the days, people named places according to its legendary tale, historical significance or unique characteristic. This applies to most mountains in Malaysia. Gunung Belumut, judging from its name most definitely named after the prevalence of mossy and slippery rocks in the area. The name Belumut could be derived from Berlumut, with "lumut" meaning moss in Malay Language, and "berlumut" meaning mossy.
The trek is not difficult for experienced, regular hikers. However, for those who have never summitted a 1000m mountain before, Gunung Belumut does pose some challenge. At 1010m, Gunung Belumut is the third tallest mountain in Johor, after Gunung Ledang (1276m and Gunung Besar (1035m). It is only about 31km (about 45minutes) away from Kluang town, and its proximity to Johor Bahru makes this a rather popular hike among Johorian and Singaporean, apart from the nearby Gunung Lambak.
How To Get There
One have to get to
Gunung Belumut Recreational Forest, the gateway to the trail head of the mountain.
Gunung Belumut Recreational Forest:
The easiest way to get to Gunung Belumut is to drive there, but for those of you who doesn’t have a car, you can also get there by taking the KTM train. The train travels direct (northbound) from JB, but a transit at Gemas is required for those travelling southbound from the north (i.e. Kuala Lumpur, Ipoh, Penang, Padang Besar) via the ETS train. These are two different trains, so a separate train tickets are required if you are travelling from the north, with one ETS train ticket to Gemas and another KTM ticket from Gemas to Kluang.
Kluang Railway Station:
If the town you are departing from doesn’t have train service, another alternative is to take an express bus to Kluang.
Kluang Bus Station:
The railway station and the bus terminal are within walking distance from each other and they are about 31km (or 45minutes) away to Gunung Belumut Recreational Forest. You can either fetch a taxi or board a local bus to get there. It’s cheaper by bus of course, but there’s quite a walk (about 40 minutes) from where you alight - the T-Junction outside an oil palm plantation (Kahang Timur). I'll suggest you save your leg muscle for the hike instead.
Breakfast at Kluang morning market
Nine of us (Vambly, Jin Hua, Jesy, Fenny, Madam Ming, Carin, Scott, Wind and myself) drove to Kluang early in the morning to meet up with Yong at Kluang morning market for breakfast.
 |
| Wantan mee for breakfast at Kluang market |
After breakfast, we headed over to the Gunung Belumut, where we met up with our guide. A group permit and a guide are needed to hike Gunung Belumut.
 |
| Ready to go after filling up our tummy |
 |
| Hutan Lipur Gunung Belumut aka Gunung Belumut Recreational Forest |
Checkpoint 1 | Unnoticed
To get to the forest, we first needed to cross a stream through a
suspension bridge. This area is commonly visited for those looking to do a
picnic.
 |
| Large campsite area |
 |
| Stream and suspension bridge |
It is also huge enough to act as a
campsite, for those who travel far and looking to spend a night before summitting the following day. Chalets are also available next to the carpark.
 |
| Suspension bridge |
 |
| Ready, get set, go! |
 |
| One more take |
After crossing the bridge, there's a fleet of stairs to climb before stepping into jungle trail. It is uphill for most part of the climb, passing through primary forest.
 |
| Stairs |
 |
| Clear, wide and easy |
The path is wide and clear with proper marking indicating each checkpoint. About 30 minutes from the trail head, is Checkpoint 1. I was so fixated in summitting that day that I never notice this checkpoint at all. All of us were in good form that day, we probably only stopped after Checkpoint 1.
 |
| Gentle inclination |
 |
| Slowly getting steeper |
 |
| Ropes are installed for assistance |
 |
| Let's work hard to slim down that thick fat thigh |
 |
| Take 5 |
Extra: Belumut Waterfall
Apparently, there is a waterfall in the forest, but we did not trek there. Our aim that day was the summit trek and therefore, we did not make any detour to the waterfall. I do remember hearing the water gushing sound while trekking to Checkpoint 1 (or was it Checkpoint 2), however I don’t remember seeing any sign directing people to the waterfall. As it turns out, the waterfall trek could be a separate one from the trek to the peak.
If you are interested to explore the waterfall, do check out this blog post I stumbled upon by chance.
Checkpoint 2 | Batu Kerang (also known as Batu Gigi, Crown Rock or Tiger’s Jaw)
Among all the Checkpoint of Belumut, Checkpoint 2 is definitely the most photographed. Here, a rock structure known as
Batu Kerang, awaits the hikers who hiked another 1 hour from Checkpoint 1.
 |
| Batu Kerang |
Literally translated to Clam Stone, the rock structure is named after its resemblance to a clam. Previously, it was also called
Batu Gigi, Crown Rock, or
Tiger’s Jaw respectively. Either name sounds befitting in my opinion.
 |
| Batu Kerang |
 |
| Batu Kerang |
 |
| Hey pretty, date me? |
Checkpoint 2 was a perfect stop to take a break and pose for photos. We spent about 20 minutes here, taking solo and group photos, before continuing our journey to the summit.
 |
| Group photo |
 |
| Ultraman pose? |
Checkpoint 3 | Balak Tumbang
The steepest part of the entire hike was after Checkpoint 3, where the uphill slope was almost
80-degree.
 |
| See that fallen trunk (Balak Tumbang) - Checkpoint 3 |
Be prepared to be on all four and grab on those roots for assistance. It was my favourite part of the trail, where I ended up ditching the rest of the team, including the guide. It has been a while since I last trek something this steep, and it was such a pleasurably hike, so I ended up being a little too ecstatic. The rest of the team probably didn’t feel the same excitement as I do (they were usually fast hikers) and they went slow and enjoyed filming the hike on video.
 |
| The trail gets tougher |
 |
| See how steep and slippery it can be? |
Somewhere along the trek from Checkpoint 3 to Checkpoint 4, as I emerged out to a bald, open area, I turned back only to see a wonderful view. Standing there under the sun, I was staring right at a peak of a beautiful mountain.
 |
| Viewpoint |
The sky was clear that day, and I knew it was a perfect time for a photograph. I waited for the team here and managed to take some nice photo for the team with that mountain peak in the background.
I have been asking around to see if anyone knows what mountain that is, with Gunung Lambak being a strong contender until I found a potential answer in some Malay blogs – Gunung Chemendong. I was still not convinced as I thought it would have been in the other direction instead, but let’s just stick with Chemendong for now, until I find my answer. If you know which mountain that is, do comment below!
After that Chemendong viewpoint (let's call it that), we had to hike uphill somemore before reaching Checkpoint 4.
 |
| Steep |
 |
| Posing for photo |
Checkpoint 4 | Campsite and Last Water Point
Checkpoint 4 is also a campsite and
last water point. Hikers can choose to spend a night here if they are doing
Trans CBR (Chemendong-Belumut-Rimau) as there is a water source nearby.
 |
| Checkpoint 4 |
As we all came prepared with 3-4 litre of drinking water, we took a short break before carrying on with our journey to the summit in order to make it there by lunch time.
 |
| This campsite can probably fit 10-20 people? |
False peak | Bukit Botak
Five minutes away from Checkpoint 4 is a false peak called Bukit Botak (Bald Hill), which is also another campsite. Here, the trail diverged into two, with the left one leading to the peak. I was told by Vambly, that the right trail (which is already blocked with tape) leads to a deeper jungle where people once encounter a tiger. This isn’t surprising given that Gunung Belumut was once closed for hiking in the 1990s after a tiger attacked some livestock in a nearby village. With this information from Vambly, I quicken my steps and made the final push to the summit, which is only another 15 minutes to go.
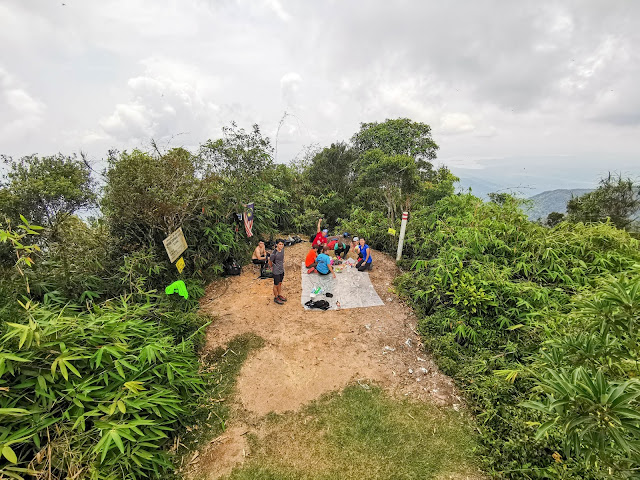
Peak | Steamboat Lunch and Birthday Celebration
Minutes before we reach the peak, we saw this rather confusing sign of “Dilarang Masuk” (which means “No Entry”). Just ignore this and move on as the peak is just right in front of you, behind a big boulder.
 |
| Go straight ahead |
 |
| Anyone knows what this is? |
 |
| Peak |
Tadah! You have summitted Gunung Belumut.
 |
| Photo at the peak is a must |
 |
| Side profile looks slimmer |
Signature icon on the peak was that particular big boulder, and everyone took turn climbing up for photos. There’s a mini ladder for assistance which is helpful for petite girls like me.
 |
| On top of the boulder |
 |
| Sunbathing? |
 |
| Looking into the distance |
Behind the scenes of the photos above:
 |
| Scott snap a photo of Jesy taking a shot of me |
 |
| Thanks babe for all the effort |
Thanks Jesy! You are the best! Hee~!
More photos:
 |
| Group photo |
 |
| Yay! |
And then we've got some wefie taken with Scott's Huawei P30 Pro
 |
| All three different love sign |
 |
| Lovely~! |
 |
| Long legs |
 |
| Extremely long legs |
 |
| We are a bunch of playful people |
Up there, you will be rewarded with the view of
Tasik Linggiu,
Batu Keris, Gunung Chemendong and the rest
Belumut Range.
 |
| Can you spot a lake at the far distance? That's Tasik Linggiu |
 |
| And this is Batu Keris |
 |
| Gunung Chemendong, the same peak we saw earlier on our way up |
The view is almost 360 degree, but it could be extremely hot when the sky is clear. So if suncare is a concern, do bring along your hat or umbrella.
 |
| And we sit under the hot sun, preparing steamboat |
It was
Madam Ming’s birthday that day, and we celebrated her big day with steamboat and cupcake. Come to think about it, we also celebrated her birthday last year on
Gunung Angsi peak when I first met these people from MMC. Hopefully, I’ll get to celebrate your birthday again next year!
 |
| Let the cooking begins |
 |
| Steamboat |
Descent via the same way
If you have missed the Chemendong Viewpoint during your ascent (or on the peak), fret not as you will definitely see it again on your way down. Just pray for good weather!
 |
| My turn for a photo |
Dinner at 128 Seafood Restaurant
It was only 5pm when we finished our shower. It’s probably too early for dinner, but we decided to eat anyway before heading back to JB since most of us were starving.
Dinner was settled at
128 Seafood Restaurant, the only restaurant Yong can think of that is opened for dinner at that hour.
We girls even wanted some dessert after the meal but couldn’t find any dessert shop that is opened. With no luck on our side, it was time to drive back to JB. Jesy and I then crossed the causeway back to Singapore, ending yet another wonderful day of hiking.
 |
| Look at the amount of rice the guys had to finish up for the girls |
Epilogue
It has been 2 months since the hike and frankly, my memory of the trip starts to wear off. It’s been two hectic months at work, and I wasn’t exactly in the mood to write. Thankfully, I pushed myself to start writing this over the weekend and the memories of the hike came back to me, pieces by pieces. This video made by Vambly does help me a lot:
Time flies when we are busy with life, and soon we will be ending the first half of the year. Hopefully, I will be able to start writing my three overdue posts (Sri Lanka, Khao Kho and Munich which I visited last year) before I become too busy in the second half of the year. Fingers crossed!
---------------------------------------------------------------------------------------------------------------------------------------------------
Thank you for reading all the way till the end. Too much info and you just want a summarised itinerary but too lazy to scroll back up? Here’s a summary I’ve drafted up for you. Hope it helps you with your planning.
Itinerary:
**Disclaimer: Below is my timing according to my speed. So please take it with a grain of salt, as everyone have different pace. Have fun hiking this mountain. *wink*
Day Hike
Total distance hiked: approximately 12.5km (one bridge crossing)
0700: Breakfast at Kluang market
0815: Gather at trail head
0830: Start hiking
0900: Reach CP1
1000: Reach CP2 (Batu Kerang) – photo session 20min
1055: Reach CP3
1135: Reach Gunung Chemendong viewpoint
1145: Reach CP4 – campsite and last water point
1150: Reach false peak (Bukit Botak)
1205: Reach summit – steamboat lunch and photo session 2 hours
1350: Descent
1400: Reach CP4
1500: Reach CP2 (Batu Kerang)
1605: Reach trail head
---------------------------------------------------------------------------------------------------------------------------------------------------
-Thanks for reading-


Hi Catherine,
ReplyDeletethank you for all the information here for Gunang Belemut, can I check with you how do I get a guide or permit to hike this mountain?
Thank you
Hi, you may check out the forestry department website: http://johor.forestry.gov.my/
ReplyDeleteHi. This website is incorrect. Can I know which website to refer too? Thank you
ReplyDelete80 degree? You must be joking or you failed your maths. That path is at most 40-50 degree. At 80 degree be prepared for rock walls
ReplyDeleteHi, i'm going to Gunung Belumut tomorrow and chanced upon your blog. Very good information about the trails. Now at least i'm mentally prepared for what to expect. Thank you :)
ReplyDeleteHey how do i get guide and permit for this trek
ReplyDelete